Dulce de Leche Cheesecake with Homemade Dulce de Leche sauce

Friday, September 11, 2020


 I love the Dulce de Leche Cheesecake from The Cheesecake Factory. C'mon, who doesn't  love their Cheesecakes? The richness of the Cheesecake with the swirls of Dulce de Leche will be a big hit the next time you have company over.  The recipe from Tasteandtellblog.com is a nice place to start, though I made my own alterations. Please read till the end before you start making this beauty. 

Difficulty level: Medium

Preparation time: 30 min, if you have the Dulce de Leche sauce( which takes atleast 1 hr)

Baking time: 50-55 min


Ingredients

  • 3 cups Graham crackers (original recipe used Vanilla wafers)
  • 4 tablespoons melted butter
  • 24 oz ( 680 gms) cream cheese, at room temperature
  • 1 cup granulated sugar
  • 2 tablespoons all-purpose flour
  • 2 teaspoons vanilla extract
  • 3 eggs, at room temperature
  • 1/3 cup milk (I used low-fat)
  • 1/2 cup Dulce de Leche, plus more for serving
For the Dulce de Leche

I can (400 gms) of sweetened condensed milk

First, prepare the Dulce de Leche sauce. Preheat the oven to 350F. Por the condensed milk into an oven-proof dish. Cover with aluminuim foil. Transfer the covered dish into a water bath ( for those of you who are not sure what a water bath is- it is a deep , say 2-3 inches , baking dish in which you pour boiling water all around the dish to be baked. This allows the item to bake more uniformly.) . Let it stay on the bottom rack of the oven for atleast 1 hour. The longer it takes in the oven, the darker it gets. Viola....the Dulce de Leche sauce is ready...
Once you have the sauce ready, let it cool to room temperature before you start with the Cheesecake. 

Preheat the oven to 400ºF. If using a water bath( I would strongly suggest you do) , wrap a 9-inch springform pan tightly with foil. ( Tips on properly securely the bottom, after the recipe)

Place the graham crackers in a food processor and process until completely crushed. Add the melted butter and pulse a few times until the crumbs are all moistened with the butter.

Press the crumbs into the prepared springform pan. Using a flat bottomed glass or measuring cup, press the crumbs firmly, but gently, to make sure they are packed and even. Place the pan in the oven and bake for 4 to 6 minutes, until the crust is lightly browned. Remove from the oven and cool to room temperature.

Reset the oven temperature to 325ºF.

Place the cream cheese in a large bowl or the bowl of a stand mixer. Using the stand mixer or an electric mixer, beat the cream cheese until it is smooth. Add the sugar, flour and vanilla and beat until combined and smooth.  Add the eggs one at a time, beating only until combined. Be careful to not overmix. Add the milk and mix just until blended.

Measure 3/4 cup of the cheesecake batter and add it to a small bowl.  Add the 1/2 cup dulce de leche and mix to combine.

Place the springform pan with the cooled crust into a larger dish with sides that go up at least 1 inch.  Pour the plain cheesecake mixture into the springform pan. Top with the dulce de leche batter by placing rounded spoonfuls over the cheesecake batter and gently swirl it into the plain batter with the tip of a knife or a skewer.

Heat about 2 cups until very hot or boiling.

Place the cheesecake in the oven, then add the water carefully into the dish surrounding the cheesecake. Close the oven door and bake until the edges of the cheesecake are puffed and set, but the center should still be a bit jiggly, 45-55 minutes.  Turn off the oven and prop the door open. Leave the cheesecake in the oven to gradually cool for about an hour. Carefully remove the cheesecake from the oven, adding extra caution with the surrounding water. Run a sharp knife around the edge of the cheesecake, then cover the cheesecake and refrigerate until completely cold, at least 4 to 6 hours, but preferably overnight.

If desired, serve the cheesecake slices with additional dulce de leche over the top.


Tips on wrapping the Springform pan

- A 9 inch round springform pan is the perfect size for cheesecakes, I think.

- Remove the bottom of the pan, and place a sheet of parchment paper over the round. Place the top of the springform pan over the round, and push it down where the edges line up and close the lever. This gives you the closed springform pan with parchment paper in the bottom, and the edges of the sheet of parchment paper sticking out.

Put 2 pieces of foil on a counter, crossing each other. Place the springform pan in the center, and wrap the pan in the foil, making sure to not only bring the sides of the foil up, but the sides of the overhanging parchment paper as well. Make sure the foil is on very tight.  Place this in a pan that is just bigger – I use a 2-inch deep think baking sheet.

once you have poured your batter into the pan, place it on the middle rack of your preheated oven. Fill the outside pan with very hot water, making sure you don’t splash the cheesecake.


Orange Cake

Friday, September 4, 2020

Summer is the time for oranges. I had been wanting to make an Orange cake forever, I would say. I finally decided that it is high time I dived right in, as I realized I will never have time for myself if I keep waiting.

The original recipe is from Prettysimplesweet.com. It yields 2 loaves or 1 bundt, as in the original version. 

If you have the patience to control yourself when the fragrance of the freshly baked cake tickles your nose, you may wait for 24 hours before you devour the cake. The orange flavour gets much more stronger if you let it rest for that long and your patience will be totally rewarded. I was so glad I made it, as I love the flavour of the fresh Orange Juice which combined with the fresh Orange zest make a world of difference. If you love oranges or anything with a pop of freshness, this is the cake for you. 


Difficulty level: Easy

Preparation Time: 15 min

Baking time: 40-50 min


Ingredients

  • 2 1/2 cups (350g) all-purpose flour, sifted
  • 2 1/2 teaspoons baking powder
  •  4 large eggs
  • 1 1/2 cups (300g) granulated sugar
  •  1 cup (240 ml) canola or vegetable oil
  •  1 1/4 cups (300 ml) freshly squeezed orange juice
  • Orange zest from 3-4 oranges (use all the oranges used for the juice)
  •  1 teaspoon pure vanilla extract


Directions


  1. Preheat oven to 350°F/180°C. Grease a 12-cup (10-inch) Bundt pan or two standard loaf pans (either 9 x 13 inch pans or 8½ x 4½ inch pans for taller cakes) and set aside. I had used 2 mini loaf pans and a square 10x10 baking pan. 
  2. In a medium bowl whisk together flour and baking powder. Set aside.
  3. In a mixer bowl fitted with whisk attachment, whisk together eggs and sugar on high speed until pale and fluffy, about 5 minutes. On low speed and with the mixer running, add oil slowly until combined. Add orange juice, zest, and vanilla extract and keep whisking slowly until combined. Add flour mixture and whisk just until combined. Take extra care not to overmix.
  4. Pour batter into prepared pan/pans. Bake for 50-60 minutes for the bundt pan or 40-50 minutes for the loaves or until a toothpick inserted into the center of the cake comes out clean. If the top is browning quickly while baking, cover loosely with aluminum foil. Allow cake/cakes to cool completely on a wire rack.
  5.  Store in an airtight container in the refrigerator for up to 5 days. For the best moist texture , serve at room temperature. This cake freezes well, so if you make 2 loaves and would like to save some for future, cover well and freeze up to 2 months and then thaw overnight in the refrigerator before use. 


Tender coconut Pudding( ഇളനീര്‍ പുഡഡിംഗ് )

Tuesday, August 7, 2012


This is a classic Kerala recipe from the 1970s to which I have added little.  Many of your moms (from Kerala) may already have  their favourite version of this coconut pudding recipe. 

This was one of the easy, go-to desserts of those times. The reason may be because all of us had coconut trees in abundance in every house. Even today people have all the means of getting tender coconuts very quickly, and so this could be called ones of the quickest and easiest to make, if you have a couple of hours (for the pudding to set).

I became a fan of this pudding when I went to India this year and my Mother-in-law made it for me. I made it myself again, and here's how:

Difficulty level: Easy
Preparation time: 10 min
Cooking time: 15 min
Setting time: 3-4 hrs

Ingredients:

Tender coconut water: 2 cups
Flesh of tender coconut: of 1 coconut, about 1 1/2 cups
Milk: 1 1/4 cups
Sweetened coconut milk: 200 gms
Agar-agar: 5 gms, dissolved in 1/2 cup water
Sugar: 3 tbsp

For Garnish: 
Shredded coconut: 3/4 cups
Sugar: 4 tbsp

In a thick-bottom saucepan, heat the tender coconut water, milk, sugar, sweetened condensed milk until luke-warm. In the meantime, in another bowl, double-boil the agar-agar until completely melted. Add the melted agar-agar to the milk mixture and mix well and keep stirring for 1 minute. 

Remove from fire and add the flesh of the tender coconut, mix well. Pour into a pudding dish and allow to set. 

To prepare the garnish, heat the shredded coconut and sugar until the sugar has caramelised and the coconut is brown and crispy. Allow to cool slightly. 

After the pudding is about 75% set (about 1 hr), sprinkle the garnish according to your liking. Allow to set completely.

Dig in!!!!!


Chilli Baby Corn

Tuesday, March 27, 2012

It has been a year since I started this blog. How time flies. I want to thank you all for your support and well wishes and hope I can continue to count on it in the future.

Most people would choose a sweet dish to celebrate an anniversary, but given that I like savory dishes more, I decided to go with that.


Difficulty level: Easy
Preparation time: 10 min
Cooking time: 30 min
Makes: 2 servings

Ingredients:


Baby corn : about 150 gms (20 numbers), cut in half width-wise

For the batter:
Corn flour(corn starch): 1/4 cup
All-purpose flour: 1/4 cup
Soy sauce: 1 tbsp
Salt: to taste, if needed (soy sauce already has salt, so keep that in mind)
Oil: for deep-frying
Water

For the gravy:
Oil: 1 tbsp
Ginger: 1" cube, cut into long thin strips
Garlic: 2 big cloves, cut into long thin strips
Bell peppers/ capsicum: 1/4 cup, chopped into about the same size as baby corn
Soy sauce: 1 tbsp
Green onions/ spring onions: 1/4cup, chopped
Red chilli paste: 1 1/2 tbsp
Sugar: 1/2 tsp
Corn flour/ corn starch: 1 1/2 tbsp, mixed with 3 tbsp water (making sure there are no lumps)
Salt: to taste

Heat oil in a skillet. In the meantime, mix the ingredients for the batter with enough water to make a slightly thick batter. Drop the cut baby corn pieces and mix to coat. Deep fry until light golden brown. Drain onto platter lined with paper towel. Keep aside.

In a skillet, heat the oil and saute the ginger and garlic slices. Once it starts to turn colour, add the bell pepper pieces and saute for a minute. Add the sauces and saute for another minute. Add the corn flour syrup and allow to boil. Add the sugar and fried baby corn. Mix well. Allow to cook for 2-3 minutes, until it gets to desired consistency. Add the green onions and remove from fire. Serve immediately topped with more spring onions. Perfect as an appetizer for any gathering. Dig in!!!!


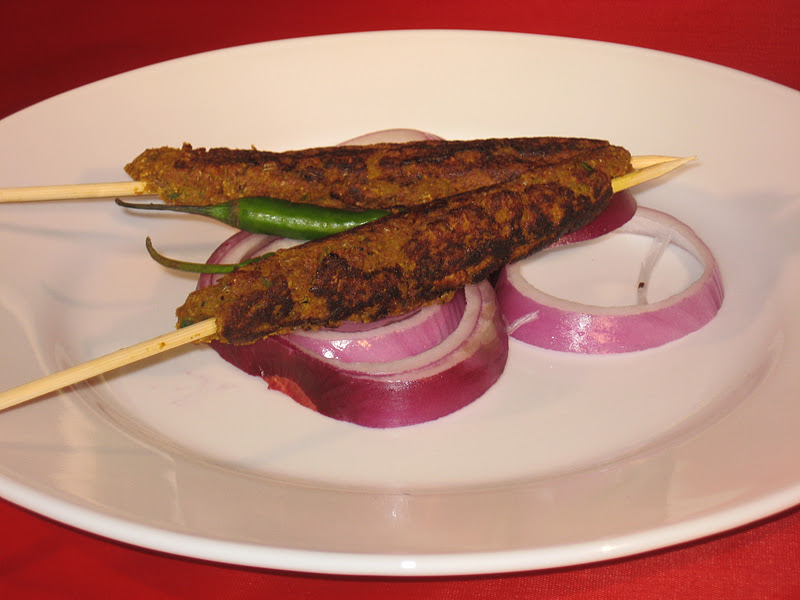
Soy chunks Kabab

Sunday, January 15, 2012

I have expressed my love for Soy Chunks elsewhere on this blog. I thought I should experiment  bit further and see if I could use Soy Chunks to fill, what I feel, is a gaping hole in the options available for vegetarians in the area of Kebabs and grilled food. How many times can you eat Paneer anyway?!


Difficulty level: Medium
Preparation time: 20-30 min+ 30 min for marinating
Cooking time: 15-20 min
Makes: 7 kababs

Ingredients:


Soy chunks: 1 1/2 cup, boiled in salted water (as per the usual package instructions)
Onion: 1/2 of a medium, coarsely chopped
Green chillies: 1-2 nos.
Curry leaves: 1 sprig (optional)
Chicken masala powder: 2 tsp
Turmeric powder: 1/4 tsp
Pepper powder: 1/4 tsp
Cumin, whole: 1/2 tsp
Lime juice: 1/2 tsp
Salt: to taste
Cooking oil : a few sprays, to coat the pan
Wooden skewers, baking tray lined with aluminium foil

Make a fine paste with all ingredients, except for the cooking oil, in a mixer. Keep in mind that the soy chunks are already salted and add additional salt as needed.

The mixture should be enough for 7 thick kababs. I like to use all the space on the skewers other than for holding,without burning my hands.

Have a baking tray (or something similar), lined and ready to arrange the skewers. Take a ball from the mixture and press onto a skewer, so as to spread it uniformly all around. Keep it onto the lined tray. Repeat for the rest of the mixture. Refrigerate the tray for at least 30 min.

Heat the grill pan (or any other flat skillet will work just fine too) and apply a few sprays of the cooking oil. You can alternatively drizzle some oil and work it around for a uniform coating. Arrange the skewers and allow to cook on a medium flame for 5-7 min on each side. Turn, and do the same with the rest of the sides to get a uniform char.

This can be served as an appetizer or entree (goes with chapathi or nan or any other bread), with cilantro chutney.


Peppermint Bark

Friday, December 16, 2011

I first made this in 2006. Ever since, this has become like a tradition during the holidays. It is an easy way to make the holidays more festive. This recipe is from Ms.Paula Deen of Food Network.

Difficulty level: Easy
Preparation time: 5 min
Cooking time: 10 min
Inactive/ setting time: 45 min
Makes: 2 lbs. of candy

Ingredients:


White chocolate: 2 lbs.(about 1 kg.)
Candy canes, crushed: 1- 1 1/4 cups
Peppermint extract(optional)

Place candy canes in a plastic bag and hammer into 1/4-inch chunks or smaller. Melt the chocolate in a double-boiler. Combine candy cane chunks with chocolate (add peppermint flavouring at this point, if desired). Pour mixture onto a cookie sheet layered with parchment or wax paper and place in the refrigerator for 45 minutes until firm. Remove from cookie sheet and break into pieces (like peanut brittle).


Ginger-bread man

Wednesday, December 14, 2011


Ever since I read the book on the Ginger-bread man to my son, he has wanted me to make them at home. So, I decided to make him some, with his help to prep. Also, he cut out the men all by himself(with the cutter, of course). What better time to make it other than for the Holidays? This recipe is from www.simplyrecipes.com. 


Difficulty level: Intermediate
Preparation time: 15 min
Cooking time: 8- 10 min/ batch
Makes: 16 (5-inch long) cookies

Ingredients:


All-purpose flour: 3 1/4cups, sifted

Baking soda: 3/4 tsp

Unsalted butter: 3/4 cups (1 1/2 sticks), room temperature/ softened

Dark brown sugar: 1/2 cup, packed

Ground ginger: 1 tbsp
Ground cinnamon: 1 tbsp
Ground cloves: 1/2 tsp
Ground nutmeg: 1/2 tsp
Black pepper: 1/4 tsp, finely ground
Salt: 1/2 tsp
Egg: 1, large
Unsulfered molasses: 1/2 cup
Raisins, chocolate chips, candy pieces: optional

For the Royal Icing: 
Egg white: 1
Lemon juice: 1/2 tsp
Confectioner's sugar: 1 3/4 cup

In a large bowl, sift together flour, baking soda and spices. Set aside.

In an electric mixer with the paddle attachment, cream the butter. Add sugar and beat until fluffy. Mix in eggs and molasses. Gradually add the flour mixture; combine on low speed. (You may need to work it with your hands to incorporate the last bit of flour.) Divide dough in thirds; wrap each in plastic. Chill for atleast 1 hr, or overnight. Before rolling out, let sit at room temperature for 5- 10 min. If after refrigerating the dough feels too soft to roll out, work in a little more flour. 

Heat oven to 350 degree F. Place a dough third on a large piece of lightly floured parchment paper or wax paper. Using a rolling pin, roll dough 1/8 inch thick. Refrigerate again for 5- 10 min to make it easier to cut out the cookies. Use either a cookie cutter or place a stencil over the dough and use a knife to cut into desired shapes. Press raisins, chocolate chips or candy pieces in the center of each cookie, if desired for "buttons". 

Transfer to ungreased baking sheets. Bake until crisp, but not darkened, 8 to 10 min. Remove from oven.  Let sit a few minutes and then use a metal spatula to transfer cookies to a wire rack to cool completely. Decorate as desired. 


To make Royal Icing:

The traditional way to make Royal Icing is to beat egg whites and lemon juice together, adding the powdered sugar until the mixture holds stiff peaks. With modern concerns about salmonella from raw eggs,you can either use powdered egg whites or heat the egg whites first to kill any bacteria. With the heating method, mix the egg white and lemon juice with a third of the sugar, hat in a microwave until the mixture's temperature is 160 deg F. Then remove from microwave, and beat in the remaining sugar until stiff peaks form. Using the powdered egg whites method, combine 1 tbsp egg white powder with 2 tbsp water. Proceed as you would otherwise. (Raw egg white alternatives from the 2006 Joy of Cooking)

If the icing is too runny, add more powdered sugar until you get the desired consistency. Fill a piping bag with the icing to pipe out into different shapes(or use a plastic sandwich bag, with the tip of one corner of the bag cut off). Keep the icing covered while you work with it or it will dry out.

Priya's hobbies Copyright © 2009 Designed by Ipietoon Blogger Template for Bie Blogger Template Vector by DaPino