Showing posts with label My own creations. Show all posts

Quick Spinach Canopies

Saturday, March 6, 2021


I had harvested a fresh batch of Organic Baby Spinach from my garden and was thinking of how to use them differently. Came up with the idea to keep it simple. This one is a quick fix finger food, the perfect starter for any parties or gatherings. And even better, it has only 5 ingredients. I am not adding the quantities, as it depends totally on your liking.


Difficulty level: Super easy

Preparation time: 10 min
Cooking time: 0 min

Ingredients
Organic baby spinach
Goat cheese- plain or spiced
Dried cranberries/raisins
Balsamic vinegar
Olive Oil


Arrange the baby spinach leaves on a serving plate. Scoop about 1 tsp roughly (make adjustments depending on the size of the leaf) of the goat cheese & add a few dried cranberries before drizzling some Olive oil and balsamic vinegar on top. It is a good mix of flavours & textures from all the ingredients in there. You don't even need to add salt as the goat cheese will have enough. Enjoy the freshness & crunch of the spinach with the burst of flavors from the other goodies.


Immunity booster Series -3 Pepper Rasam

Sunday, January 31, 2021


When you are down with a cold or flu, all you need is some magic portion to get you back on your feet. This used to be the go-to thing as it has all the secret ingredients you need to cure all the ailments relating to cold and/or flu. By the next morning, all the discomforts are all behind you and you feel as fresh as ever all over again.


Difficulty level: Medium
Preparation time- 10 min
Cooking time- about 45 min


Ingredients

Dry tamarind- 1/4 cup, packed
Ginger- 2 inch square chunk, skin on
Garlic- 5 small or 2 big cloves, skin on
Whole black peppercorns- 1 tbsp
Cumin seeds- 1 1/2 tsp
Dry red chillies- 3
Curry leaves- 2 sprigs
Salt-to taste

For spluttering:

Organic virgin coconut oil- 1 tsp
Mustard seeds- 1/2 tsp
Dry red chillies- 2
Curry leaves- 1 sprig


Soak the tamarind in 5 cups of warm water for about 15 minutes.

In the meantime, use a mortar and pestle to crush most of the other ingredients in 2 batches. First crush the ginger and garlic with their skins on. Transfer to another bowl and crush the peppercorns, curry leaves, cumin and red chillies in the same mortar and pestle. Crush them and add to the earlier batch.

Squeeze the tamarind well and dispose of the waste. To this water, add the crushed items and a pinch of salt. Let it come to a boil and then reduce to a simmer. Let it simmer away for atleast 15 min allowing all the flavours to marry together and turn it into a magical concoction. The water should have reduced to three-fourths its original quantity. Keep aside.

In a small fry pan, add 1 tsp of organic virgin coconut oil and add the mustard seeds. Once it splutters, add the red chillies and curry leaves. Mix everything well and pour it right on top of the rasam prepared. Cover and set it sit for atleast 2 minutes. Make sure you drink just the top portion only. Serve warm with rice or drink it as it is to feel better. 

Best Homemade Garlic Knots

Friday, January 22, 2021


These are the best homemade garlic knots. They are made from homemade dough, leftovers freeze beautifully, are super soft and fluffy, golden brown and works best with extra garlic butter.


Who doesn't love the aroma of fresh home-made breads & rolls filling the air? This simple recipe gives you soft, fluffy rolls and the garlic herb butter adds a nice flavour to the already piece of heaven.

This batch yields 2 lbs of dough for 16 knots or 1 pizza plus 8 knots. I use the same dough for cheesy breadsticks as well. You can buy the store-bought pizza dough, but I like to make it from scratch if you can allow 60-90 minutes to rise. Also make sure that the yeast is fresh and use the correct temperature (between 100-110°F/ 38-43°C) water.

Difficulty: Easy
Preparation time: about 2 hrs
Baking time: 18-22 min

Ingredients
1 and 1/3 cups (320ml) warm water
2 and 1/4 teaspoons active dry yeast(1 standard sachet)
1 Tablespoon granulated sugar
2 Tablespoons olive oil
3/4 teaspoon salt
1/2 teaspoon garlic powder
3 and 1/2 cups (450g) all-purpose flour plus more for hands and work surface

Topping:
5 Tablespoons (70g) unsalted butter, melted
3 garlic cloves, minced or 1/2 teaspoon garlic powder
1 teaspoon Italian Seasoning
1/4 teaspoon salt
optional after baking: 1/4 cup grated Parmesan cheese
optional after baking: 2 Tablespoons chopped fresh parsley


Whisk the warm water, yeast, and granulated sugar together in the bowl of your stand mixer fitted with a dough hook or paddle attachment. Cover and allow to rest for 5 minutes. *If you don’t have a stand mixer, simply use a large mixing bowl and mix the dough with a wooden spoon or rubber spatula in the next step.

Add the olive oil, salt, garlic powder, and half of the flour. Beat for 15 seconds, then add the remaining flour. Beat on low speed for 2 minutes. Turn the dough out onto a lightly floured surface. With lightly floured hands, knead the dough for 3-4 minutes. The dough can be a little too heavy for a mixer to knead it, but you can certainly use the mixer on low speed instead. After kneading, the dough should still feel a little soft. Poke it with your finger – if it slowly bounces back, your dough is ready to rise. If not, keep kneading.

Lightly grease a large bowl with oil or nonstick spray– just use the same bowl you used for the dough. Place the dough in the bowl, turning it to coat all sides in the oil. Cover the bowl with aluminum foil, plastic wrap, or a clean kitchen towel. Allow the dough to rise at room temperature for 1-2 hours or until double in size. (Tip: For the warm environment on a particularly cold day, heat your oven to 150°F (66°C). Turn the oven off, place the dough inside, and keep the door slightly ajar. This will be a warm environment for your dough to rise. After about 30 minutes, close the oven door to trap the air inside with the rising dough. When it’s doubled in size, remove from the oven.)

Shape the dough: When the dough is ready, punch it down to release the air. Using floured hands on a lightly floured work surface, shape the dough into a 16×5 inch log. (5 inch width really isn’t as important as the 16 inch length here, no need to be exact.) Using a very sharp knife, pizza cutter, or bench scraper, slice into 16 1-inch strips. Roll each strip into 8 inch ropes. Tie each into knots. You can tuck the two ends of the knots underneath the knot or leave them out, that’s up to you. Arrange the knots on 2 lined baking sheets. (Either parchment paper or silicone baking mats work.)

Lightly cover the shaped knots and let them rest for at least 30 minutes and up to 45 minutes. They will slightly puff up during this time, producing softer rolls.

Towards the end of the rise time, preheat oven to 400°F (204°).

Topping: Stir the melted butter, garlic, Italian seasoning, and salt together. Brush on the knots. Reserve some of the topping for when the knots come out of the oven.

Bake for about 18-23 minutes or until golden brown on top. Remove from the oven and brush the warm knots with remaining garlic butter. Sprinkle with parmesan cheese and/or parsley, if using.

Serve plain or with marinara sauce for dipping.

Cover and store leftover knots at room temperature for up to 2 days or in the refrigerator for up to 1 week. Freeze baked and cooled knots for up to 3 months. Thaw on the counter, then reheat as desired. (I usually just microwave them for a few seconds.)


Spicy Artichoke Wraps

Friday, January 15, 2021

Artichokes have a very subtle taste and flavor. It is a seasonal vegetable, except may be not in California. 

Even though subtle, it really comes through when you combine it with a mild cheese and may be some bread crumbs. I always indulge in the fresh ones when it is available. During the rest of the months, I keep a couple of canned artichoke hearts handy in the hope of transforming them into something yummy.

Here I made the artichoke hearts which is originally from USA with Indian spices and combined it with Middle-eastern tahini sauce and kaboos(Arabic bread) pairing it with Peri-peri sauce for the spread. It also adds in a Mediterranean touch with Kalamata olives and onions, making it a truly International dish. You can substitute the peri-peri sauce with any spicy sauce and kaboos with tortilla or chapathi, depending on what is available to you. 


Difficulty level: Medium
Preparation time: 5 min
Cooking time: 20 min


Ingredients
Artichoke hearts- Canned, in water- 1(240 g ,drained)
Cooking oil- 1 tsp
Coriander powder- 1 tsp
Red chilly powder- 3/4 tsp
Turmeric powder- 1/4 tsp
Salt-to taste
Tahini sauce - 2 tsp
Peri-peri sauce- 1 tsp
Red onion- half of an onion, cut into long strips
Kalamata olives- 10 nos., pitted & cut into long pieces


Chop up the well-drained artichoke hearts roughly. Heat oil in a pan and add the spices. Stir for a minute and add the chopped artichoke hearts. Add salt to taste . Mix well and cook for a few minutes on a low flame, until the water is all gone and it gets the artichoke gets a good coating of the spices all over it.

In the meantime, warm up a large kaboos. In a small bowl, mix the tahini with the peri-peri sauce well. Pour the mix on the kaboos and spread uniformly all over it. Spread a layer of the onions and olives in a single line . Add the cooked artichoke right on top. Tightly roll the kaboos into a tight log making sure everything can be tasted in every bite. Enjoy the wrap warm right away, as it gets soggy if left assembled for a long time.


Immunity Booster Series- 2 Gooseberry Chutney

Friday, January 8, 2021


Indian gooseberry or Amla is another nutrient-packed food that can be eaten fresh, as nature delivers it to you.  It is a very seasonal fruit. Traditionally, we have the practice of preserving it in brine or in the form of pickles (with both salt and oil acting as preservatives).  

It is a superfood for the whole body from hair ( I really mean it, it is SO SO good for your hair) to toe. Whenever I can find it here, I buy it and preserve it in some water  with a generous amount of salt and a few spicy green chillies slit in half. It lasts forever and it can be had even as a snack, when you want something different. In the recipe, I have used the ones in brine, but you can always substitute for the fresh ones. 


Difficulty level: Easy
Preparation time: 10 min
Cooking time: 0 min


Ingredients

Gooseberry (or Amla) - 8 or 9, big ones pitted
Dry red chillies- 3 or 4, to your liking (I use a skewer to roast them on a flame for that smoky flavor)
Grated coconut- 1/8 cup
Curry leaves- 2 sprigs
Salt- to taste
Organic Virgin coconut oil- a few drops(optional)


In a mixer grinder, add the grated coconut, dry red chillies(roasted or not), salt and curry leaves. Grind until it's almost fully smooth. Add the pieces of amla and continue grinding until everything is uniformly smooth. Check salt at this stage and add more if needed. Drizzle a few drops of organic virgin coconut oil for added aroma and goodness. Enjoy right away or keep it fresh in the refrigerator for about 4-5 days.

Chili's Inspired Black bean burger with Ground peppercorn sauce & blue cheese

Friday, December 18, 2020


I used to love going to Chili's ever since that life-changing discovery on one of my early visits.  Their burgers are phenomenal and they can serve  a vegetarian black-bean substitute with all the other toppings, on request. I have been addicted ever since. Shockingly, they do not serve it in any of their locations worldwide outside of US.  I was so addicted to the extent that I wrote to Chili's USA and they responded saying they have logistics issue serving them worldwide as they do not want to compromise on the quality. I hence decided to make them in my kitchen whenever I was craving them. 


Difficulty level- Medium
Preparation time- 15 min
Cooking time- 30 min, for both the sauce & patty together


Ingredients

Cooked black beans- 1/2 cup(refer to my notes on how to cook dry black beans) or 1 14 oz can of black beans
Onion- 1 small
Garlic- 2 cloves crushed or 1/4 tsp minced or powdered garlic
Cajun seasoning- 2 tsp
Bread crumbs- 1/2 cup
Egg-1
Hot sauce- 1/2 to 1 tsp , as desired
Dried herbs- 1/2 tsp
Fresh ground black pepper- 1 tsp
Blue cheese crumbles- 1 tbsp
Salt-to taste
Burger buns, lettuce, tomato, cheese, ketchup- to your liking

For the Ground peppercorn sauce

Butter-35 gms
All purpose flour - 35 gms
Milk- 200 ml( any fat-level will work)
Vegetable stock- 100 ml
Black peppercorns- about 4 tsp
Brandy- optional, 1 tbsp


Preparing the sauce

Crack the black peppercorns in a pestle and mortar (if you don’t have one, put them in a plastic bag, wrap in a tea towel, and hit a few times with a rolling pin) – You want to make sure that the peppercorns are cracked, but do not over-grind otherwise the sauce will lose its intense peppery flavour. In a small saucepan, melt the butter on a low heat. Once the butter is fully melted, gradually add the flour. After each addition mix well to ensure it is fully combined with the butter. Once all the flour is added you should have a thick smooth paste. Cook the butter and flour mix for a couple of minutes stirring regularly – Cooking the butter and flour mix for a couple of minutes before adding the other ingredients ensures that the flour is cooked. If you skip this step your finished sauce may have an odd floury taste. If you decide to add the brandy, add it at this tage and mix well to combine with the butter and flour – adding the brandy at this stage ensures that the alcohol is cooked off.Gradually add the milk , mixing well after each addition to combine with the butter and flour – I like to switch to using a whisk at this stage as it helps to break down any lumps. Once all the milk is combined, add the chicken stock and black peppercorns and season with salt. Simmer gently until the sauce has reduced to your required consistency.


Making the black bean patty

Drain beans well. Put onion and garlic in food processor and blend until fine. Add beans and blend well until mashed consistency. Place into a mixing bowl and add bread crumbs, egg, hot sauce, parsley, Cajun seasoning, and stir. Mix well and shape 4 patties (I opted to make 3 larger patties). Make a dent in the middle top portion and add some fresh ground pepper and some blue cheese crumbles. Seal the opening well. Place on a well-greased stovetop grill pan like I did or use an outdoor grill. Cook 5-6 minutes on each side. You can also broil in the oven for 10-12 minutes per side on a greased, foil-lined pan. Once thoroughly cooked, spread the remaining blue cheese crumbles on top of the patty. If using a pan, add some water all around the patty and close the lid covering the entire pan , after sprinkling the blue cheese. It creates a steaming effect, and makes the cheese melt beautifully over the patty.
Stack them along with all the accompaniments, to your liking and enjoy..

Note- Soak the dry black beans overnight or 8-9 hrs. Cook in a pressure cooker for 3 whistles.


Crab Roast

Friday, November 27, 2020


Crab meat is very hard to extract from the shell. But my son really likes it and so I decided to go through the trouble of extracting it after a long time. 


Difficulty level: Easy
Preparation time- 10 min
Cooking time- 10 min

Ingredients 
Crab - Cleaned & meat separated- 1/4 cup
Onion - cut into thin strips- 1/4 cup
Turmeric powder - 1/4 tsp
Chilly powder - 1 tsp
Ginger garlic paste - 1 tsp
Oil - 2 tsp
Salt -to taste
Curry leaves - 1 sprig


Make sure you clean the crab and separate the meat. Heat oil in a skillet, add the ginger garlic paste and saute well. Add the sliced onions, sprinkle some salt and saute until the onions turn light brown. Add the spices and curry leaves and cook for a minute until the raw taste of the spices have disappeared. Add the crab meat, add salt to taste and mix well. Cover and cook for 7 -10 minutes on a low flame. Serve warm with roti or rice. 


Quick Kesar Malai Laddoo

Friday, November 13, 2020


Happy Diwali everyone...

During these odd times, nobody wants to spend hours in the kitchen preparing Diwali sweets. I am in the same boat and hence came up with a laddoo, so instant ( when you compare it to the rest of the sweets usually prepared for Diwali), you would never believe how easy this is with no compromise on the taste.


Difficulty level: Easy
Preparation time: 10 min
Cooking time: 2-3 min


Ingredients
  • Milk powder- 1 cup
  • Ghee( clarified butter)- 1/ 4 cup plus 1 tbsp, and a couple of drops to grease your palm to make the laddoos
  • Cashews- 12-15
  • Raisins-25
  • Granulated sugar- 1/4 cup
  • Cardamom- 3 pods
  • Saffron- a few strands


In a skillet, heat 1 tbsp ghee(clarified butter) on medium-low heat and roast the cashews until they turn golden brown and put aside. To the same ghee, add the raisins and fry them until they puff up. Keep aside. Add the rest of the ghee and allow to melt completely. Turn off the stove and after 3-4 minutes add the strands of saffron. This will allow the flavors to infuse into the ghee slowly.

While the ghee cools completely, powder the sugar and the seeds inside the pods of cardamom into a fine powder. Also crush the roasted cashews using a mortar and pestle or a food processor (just pulse it a couple of times). In a mixing bowl, add the milk powder, powdered sugar, crushed cashews, roasted raisins and mix well. Pour the saffron-infused ghee on top and mix well using a spatula. Once it is thoroughly mixed, grease your palms and roll the mixture into small lemon-sized balls. This yields 14 such laddoos. The number may vary depending on the size of your balls. It stays fresh at room temperature for 3-4 days.


Oreo Fudgy Brownies

Saturday, November 7, 2020

Oreos are a kids' favorite and a lot of the adults I know love it too. I have incorporated Oreos and marshmallows to the brownie to make it all the more chewy. It is a fudgy, chewy, brownie goodness which will make you go back for more. 


Ingredients

1 cup butter, melted
1 cup granulated sugar
1 1/2 cups light brown sugar, packed
1 tablespoon vanilla
4 large eggs
1 teaspoon kosher salt
1 1/2 cups all purpose flour
1 cup unsweetened cocoa powder
1 cup white chocolate chips
1/2 cup mini marshmallows
30 Oreo cookies coarsely chopped


Preheat your oven to 350°F/175°C. Line 9×13 pan with foil and spray with nonstick spray. Set aside. In the bowl of stand mixer fitted with the paddle attachment combine the butter, granulated sugar, brown sugar, vanilla, and eggs. Mix on medium speed until combined, about 1 minute. Add in salt and the cocoa powder and mix on medium until combined, 30 seconds to a minute. Turn the mixer to low and add in the flour until incorporated. Mix in the chocolate chips and mini marshmallows. Spread half of the batter into the pan. Top with the Oreos and spread the remaining batter on top.

Bake for 35-40 minutes until the centre is almost set. It can stay fresh in an airtight container for about 3 days..I doubt this will remain at the end of the 3rd day anyway...

Chilli Baby Corn

Tuesday, March 27, 2012

It has been a year since I started this blog. How time flies. I want to thank you all for your support and well wishes and hope I can continue to count on it in the future.

Most people would choose a sweet dish to celebrate an anniversary, but given that I like savory dishes more, I decided to go with that.


Difficulty level: Easy
Preparation time: 10 min
Cooking time: 30 min
Makes: 2 servings

Ingredients:


Baby corn : about 150 gms (20 numbers), cut in half width-wise

For the batter:
Corn flour(corn starch): 1/4 cup
All-purpose flour: 1/4 cup
Soy sauce: 1 tbsp
Salt: to taste, if needed (soy sauce already has salt, so keep that in mind)
Oil: for deep-frying
Water

For the gravy:
Oil: 1 tbsp
Ginger: 1" cube, cut into long thin strips
Garlic: 2 big cloves, cut into long thin strips
Bell peppers/ capsicum: 1/4 cup, chopped into about the same size as baby corn
Soy sauce: 1 tbsp
Green onions/ spring onions: 1/4cup, chopped
Red chilli paste: 1 1/2 tbsp
Sugar: 1/2 tsp
Corn flour/ corn starch: 1 1/2 tbsp, mixed with 3 tbsp water (making sure there are no lumps)
Salt: to taste

Heat oil in a skillet. In the meantime, mix the ingredients for the batter with enough water to make a slightly thick batter. Drop the cut baby corn pieces and mix to coat. Deep fry until light golden brown. Drain onto platter lined with paper towel. Keep aside.

In a skillet, heat the oil and saute the ginger and garlic slices. Once it starts to turn colour, add the bell pepper pieces and saute for a minute. Add the sauces and saute for another minute. Add the corn flour syrup and allow to boil. Add the sugar and fried baby corn. Mix well. Allow to cook for 2-3 minutes, until it gets to desired consistency. Add the green onions and remove from fire. Serve immediately topped with more spring onions. Perfect as an appetizer for any gathering. Dig in!!!!


Soy chunks Kabab

Sunday, January 15, 2012

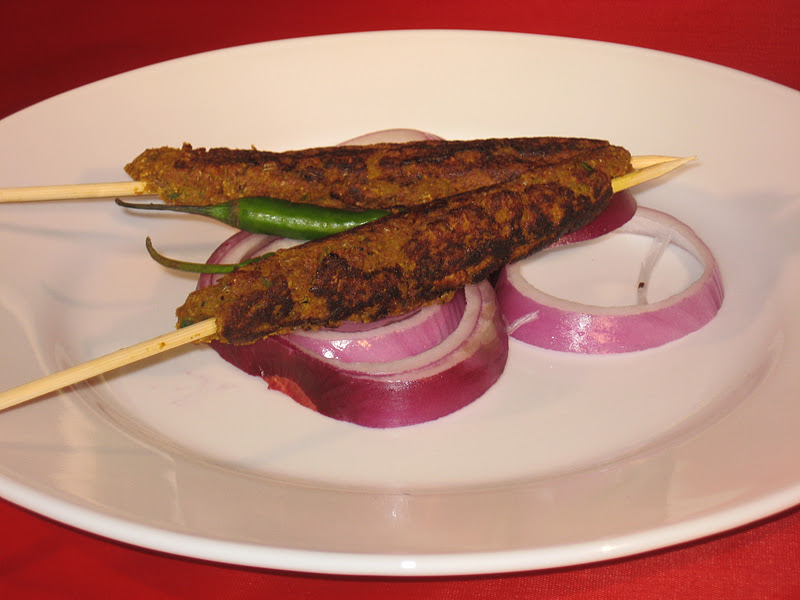
I have expressed my love for Soy Chunks elsewhere on this blog. I thought I should experiment  bit further and see if I could use Soy Chunks to fill, what I feel, is a gaping hole in the options available for vegetarians in the area of Kebabs and grilled food. How many times can you eat Paneer anyway?!


Difficulty level: Medium
Preparation time: 20-30 min+ 30 min for marinating
Cooking time: 15-20 min
Makes: 7 kababs

Ingredients:


Soy chunks: 1 1/2 cup, boiled in salted water (as per the usual package instructions)
Onion: 1/2 of a medium, coarsely chopped
Green chillies: 1-2 nos.
Curry leaves: 1 sprig (optional)
Chicken masala powder: 2 tsp
Turmeric powder: 1/4 tsp
Pepper powder: 1/4 tsp
Cumin, whole: 1/2 tsp
Lime juice: 1/2 tsp
Salt: to taste
Cooking oil : a few sprays, to coat the pan
Wooden skewers, baking tray lined with aluminium foil

Make a fine paste with all ingredients, except for the cooking oil, in a mixer. Keep in mind that the soy chunks are already salted and add additional salt as needed.

The mixture should be enough for 7 thick kababs. I like to use all the space on the skewers other than for holding,without burning my hands.

Have a baking tray (or something similar), lined and ready to arrange the skewers. Take a ball from the mixture and press onto a skewer, so as to spread it uniformly all around. Keep it onto the lined tray. Repeat for the rest of the mixture. Refrigerate the tray for at least 30 min.

Heat the grill pan (or any other flat skillet will work just fine too) and apply a few sprays of the cooking oil. You can alternatively drizzle some oil and work it around for a uniform coating. Arrange the skewers and allow to cook on a medium flame for 5-7 min on each side. Turn, and do the same with the rest of the sides to get a uniform char.

This can be served as an appetizer or entree (goes with chapathi or nan or any other bread), with cilantro chutney.


Oven-roasted full chicken ( നിര്‍ത്തിപോരിച്ച കോഴി)

Monday, November 28, 2011

Thanksgiving usually calls for a Roast Turkey. But we decided to switch the bird and add a few Indian flavours.

Difficulty level: Difficult
Preparation time: 15 min + 12 - 14 hrs for marination
Cooking/ roasting time: 1 hr. 45 min
Makes: 1 full chicken

Ingredients:


Chicken: 1 whole, (about  4 lbs.)
Lime juice: 2 1/2 tsp
Kashmiri chilli powder: 4 tsp
Turmeric powder: 1/2 tsp
Meat masala: 2 tbsp
Ginger-garlic paste: 1 tbsp
Cumin powder: 1 tsp
Oil: 1 tbsp
Onion: 2, cut into thick pieces
Salt: to taste
Water
Kitchen twine

Clean the chicken well (taking care to remove the niblets and anything unwanted in there) and remove the skin completely. Clean well again, and massage the lime juice uniformly over the chicken. Keep aside.

In the meantime, make a paste of chilli powder, turmeric powder, meat masala, ginger-garlic paste, cumin powder and salt, adding oil and enough water.

Apply the masala paste uniformly over the chicken, taking care to get it all over the bird(even inside). Refrigerate overnight, or 12- 14 hrs.

Allow the chicken to rest at room temperature for at least 2-3 hrs. Preheat the oven to 350 degree F.

In a roasting pan, spread a thick layer of the onions and lay the full chicken on top,taking care to tie the legs securely with the kitchen twine. Roast it for 1 hr. 45 min. to 1 hr. 55 min - depending on your oven. What you should be looking for is an internal temperature of more than 165 F( make sure you insert the thermometer into the thigh, without touching the thigh bone).

Remember to cut off the twine. You can carve it and serve warm.


The chicken, before it went into the oven

Quick Roasted Paneer Kababs

Friday, November 25, 2011

A few days ago, my son asked me if he could eat Paneer for dinner. I came up with this recipe for him. It is quick and not too spicy.

You can definitely add more heat to the dish to please your individual palette.

Difficulty level: Easy
Preparation time: 5 min + 30 min. for marinating
Cooking time: 10-15 min
Makes: 4-5 servings

Ingredients:


Paneer: 200 gms, cut into-bite sized pieces
Turmeric powder: 1/4 tsp
Kashmiri chilli powder: 1/2 tsp
Cumin powder: 1/2 tsp
Egg masala powder: 1 tsp
Oil: 1 tsp + 1 tbsp
Salt: to taste

In a bowl, mix all the spices with 1 tsp oil and enough salt. Combine well to get the spices uniformly distributed. Add the paneer pieces and mix everything together well with your fingers. Keep aside for atleast 30 min.

In a skillet, heat 1 tbsp oil on a high flame. Add the paneer, all at once, and reduce the flame. Cook the paneer on every side, turning every 2-3 minutes.

Serve warm with mint or coriander chutney.


Sweet Paneer Tacos

Thursday, November 10, 2011

Tacos are a Latin American specialty, where you have some combination of meat held in a Tortilla. I decided to create a Taco with Paneer. While my initial thoughts were to make a savory filling, I ended up trying a sweet version.

I don't usually make many sweet main courses and I was just pushing the envelope a bit. I must say I was surprised at how well it turned out. I should perhaps look at other non-savory main courses


Difficulty level: Easy
Preparation time: 5 min
Cooking time: 15 min
Makes: 12 tacos

Ingredients:


For the filling:
Paneer: 200 gms, cut into 1/4" cubes
Oil: 1 tbsp
Onion: 1/4 of a medium, finely chopped
Turmeric powder: a pinch
Cumin powder: 1/4 tsp
Tamarind-Date chutney: 4 tbsp + 2 tbsp for drizzling on top
Salt: a pinch
Cilantro: chopped, 1/4 cup
Cucumber: cut into cubes, 1/2 cup

For the tacos:
Chapathi dough: 1 cup

Heat oil in a skillet and saute the onion until light brown. Add the turmeric powder and cumin powder. Saute for a minute. Add the paneer and saute for 3-4 min. Add the salt and 4 tbsp tamarind-date chutney,  mix well. Add the chopped cilantro and mix to distribute it uniformly. Allow to cook for 3-4 min on a very low flame.

In the meantime, roll out thick chapathis (similar to puris) and make them as you would normally do.

To assemble the Tacos, take a chapathi and fold it in the middle to look like a taco shell. Add a few pieces of cucumber, top it with the paneer filling and for a final touch drizzle more sauce on top. Dig in while it is still warm.


Indo-Chinese Sesame Potato

Monday, November 7, 2011

This is a dish that I came up with one evening as I was wondering what to make. It actually turned out quite well.

Difficulty level: Easy
Preparation time: 5 min
Cooking time: 20 min
Makes: 2 servings

Ingredients:


Potato: 1 1/2 cups, chopped (3 small nos.)
Onion: 1 small, finely chopped
Oil: 2 tbsp
Green chillies: 3, cut in half length-wise
Toasted white sesame seeds: 2 tsp
Soy sauce: 2 tsp
Chilli paste: 3 tsp
Tomato ketchup: 2 tsp
Cilantro: 1/4 cup, chopped
Salt: to taste

Heat the oil in a skillet, and on a medium-high flame saute the potatoes until light brown (the potatoes should have completed 80% of its cooking at this stage) in colour. Drain and keep aside.

To the same oil, add the onions and sesame seeds, saute until light brown. Add the green chillies and saute for 2-3 min. Add the sauces and mix well. Add the fried potato and mix until everything is combined well. Add the chopped cilantro and more salt, if needed, at this stage. On a medium-low flame, continue to cook for 4-5 min, stirring occasionally.

Serve warm with chapathi or naan.


Priya's hobbies Copyright © 2009 Designed by Ipietoon Blogger Template for Bie Blogger Template Vector by DaPino