Old-fashioned Apple Cobbler

Friday, October 30, 2020


I really miss the falls in the US. It used to be my favourite season. With the nature looking its prettiest in fall colors and the aroma of the seasonal harvest filling the air , we used to go apple-picking. I used to make everything imaginable with apples. This is one of my favorites. 

Difficulty level : Easy
Preparation time: 15 minutes
Baking time:  40-45 minutes

Ingredients

  • medium apples (Granny Smith, Golden Delicious, or other good baking apple), peeled and cut into chunks ¼ inch thick
  • 1 cup water or apple juice
  • 1/3 cup brown sugar , packed
  • 1 Tablespoon cornstarch
  • 1 Tablespoon lemon juice
  • 1/2 teaspoon vanilla extract
  • 1 teaspoon ground cinnamon
  • 1/2 teaspoon ground nutmeg
  • 1/8 teaspoon salt

For the batter:

1 c
  • 1 cup all-purpose flour
  • 1 cup granulated sugar
  • 2 teaspoons baking powder
  • 1/4 teaspoon salt
  • 3/4 cup milk
  • 5 Tablespoons butter , melted
  • ground cinnamon for topping


Directions: 

  • Preheat the oven to 350°F and grease a 9×13 inch pan lightly with cooking spray.
  • Stir together brown sugar, water, cornstarch, lemon juice, vanilla, cinnamon, nutmeg, and salt together in a saucepan. Stir in apples. Cook over medium heat for 3-5 minutes, stirring.
  • Pour mixture into prepared pan.
  • In a large bowl mix together the flour, sugar, baking powder, and salt. Stir in the milk and melted butter, just until combined.
  • Pour the mixture over the apples in the pan. Sprinkle lightly with cinnamon.
  • Bake for about 38-40 minutes or until a toothpick inserted into the topping comes out clean.
  • Allow to cool for at least 15 minutes before serving. Serve warm with vanilla ice cream, if desired.
  • Cover and store leftovers in the refrigerator for up to 4 days


    .

Make Ahead:
You could prepare the apple filling and store it in the fridge for up to 3 days, or freeze it for up to 3 months.
You can also freeze the baked cobbler for up to 3 months. Thaw overnight in the refrigerator and warm in the oven before serving.


Coconut Burfi (Microwave)

Friday, October 23, 2020


During the Navrathri(festive) season, everyone is in the lookout for quick sweets you can whip up in a jiffy with this recipe from Tarla Dalal. You could add some color, but I decided to keep it colorless as it is for offering to Goddess Saraswathi for the Navrathri pooja. As the preparation is completely in the microwave, it will save you a lot of time and energy you would otherwise spend in front of the stove.

Difficulty level: Easy
Preparation time: 5 min
Setting time: 1 hr.

Ingredients
Grated coconut- 1 cup
Ghee- 2 tsp
Milk- 1/4 cup
Sugar- 3 tbsp
Cardamom- 1/4 tsp
Color-optional, a pinch


Mix the grated coconut and ghee well in a microwave safe bowl, and cook for 2 minutes, stirring after 1 minute. Take the bowl out, add in the rest of the ingredients. Mix them thoroughly and cook for another 2 minutes , stirring after 1 minute. Transfer on to a greased dish with 5" diameter and allow to set for 1 hr. Cut into desired shapes and enjoy.


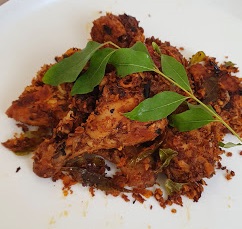
Chicken Coconut Fry

Friday, October 16, 2020


Coconut is used in every possible way in our neck of the woods. Here I have used it in its raw , grated form. I am always in the lookout for a new way to prepare chicken , which happens to be the most popular meat in my house any way. 

Difficulty level: Medium

Preparation time: 10 min plus 2 hrs for marination

Cooking time: 30 min


Ingredients

Chicken- whole, curry cut (roughly 10 pieces)

Lime juice- 1 tbsp

Coriander powder- 3 tbsp

Chilli powder(spicy)- 1 1/2 tbsp

Kashmiri chilli powder- 1 1/2 tbsp

Salt- to taste

Ginger paste- 2 tsp

Garlic paste- 1 tsp

Grated coconut- 1 cup

Crushed red chilly flakes- 1 tsp

Garlic- 4 cloves whole with skin, slightly crushed

Curry leaves- 5 sprigs

Extra virgin coconut oil- 3 tbsp


First, marinate the chicken and keep aside for 2 hrs. Mix together both the chilli powders, coriander, lime juice, ginger paste, garlic paste and salt well and apply uniformly on all the chicken pieces. 

In a frying pan, heat 1 tbsp of  extra virgin coconut oil and add the grated coconut , crushed red chilly flakes, whole garlic cloves, curry leaves and a pinch of salt. Fry them on low flame so as to ensure the coconut  does not get burnt. Don't rush it by increasing the flame, it is very well worth the wait.  Once the coconut turns light brown , remove and keep aside. To the same oil, add the remaining oil and add the chicken pieces . Turn the chicken pieces making sure they are thoroughly cooked. Once they are, add the roasted coconut mixture and mix well for all the flavours to marry together. Roast on a very low flame for 3-4 minutes. Serve warm with rice or chapathi or roti .


Mango Peda/Mango Fudge

Friday, October 9, 2020


Peda is a very traditional Indian sweet. It can very well be made instantly at home with a little bit of  patience and elbow grease. I wanted to combine the flavour of mangoes to give it a twist. Who doesn't like mangoes? I have made minor changes to the recipe from Archana Hebbar here. This stays in room temperature for a week, so feel free to make plenty to share. 


Difficulty level: Medium
Preparation time: 5 min
Cooking time: 30-40 min

Ingredients

  • Ghee( clarified butter)- 2 tbsp
A few strands of saffron
Mango pulp- 1 cup
Granulated sugar- 1/4 cup
Milk powder- 1 cup
Powdered cashew- 1/4 cup
Cardamom powder- 1/4 tsp


In a large frying pan heat 2 tbsp ghee, ¼ cup milk, few thread saffron and 1 cup mango pulp.
Stir well making sure everything is well combined.
Now add ¼ cup sugar and stir until sugar dissolves completely.
Further, add 1 cup milk powder and ¼ cup cashew powder.
Mix well making sure the mixture is well combined.
Mash well making sure there are no lumps present.
keeping the flame on low, stir continuously. the mixture thickens after 5 minutes.
Further, add ¼ tsp cardamom powder and mix well.
After 15 minutes, the mixture starts to separate the pan and holds shape. do not overcook as the peda hardens.
Transfer the prepared mixture into a greased plate and spread uniformly.
Cool for 5 minutes, and start preparing ball-sized peda.
Design using the flower mould if you happen to have it. you can also decorate using a toothpick or fork. I have kept it naked here.
Mango peda stays fresh for a week when stored in an airtight container.


Cheesy straws

Sunday, October 4, 2020


With the kids studying from home due to the pandemic, there is an insatiable need for a variety of snacks at home. I decided to whip something up with things I had in hand. The more cheese you add, the yummier it gets. And who doesn't like cheese....


Difficulty level: Easy

Preparation time: 15 min

Baking time: 25 min


Ingredients

Puff pastry sqaure sheets- 10

Shredded cheese- atleast 1 1/4 cups(I used cheddar & parmesan combined)

Italian seasoning- 2 tbsp

Fresh ground black pepper- 2 tbsp

Salt- to taste


Thaw the puff pastry sheets for atleast 3 hrs. Preheat the oven to 400F. 

Combine the shredded cheese, Italian seasoning, fresh ground black pepper and salt well and keep aside. 

On a working surface, spread some the cheese mixture evenly. Put one of the puff pastry sheets and press down lightly so that the cheese mix sticks to the sheet. Spread more of the cheese mix evenly and pat down. Make 1 inch wide strips using a pizza cutter. Twist the strips to make them  curly. Transfer to a baking tray. Bake for 25 minutes until the cheese has melted and and the puff pastry has turned crisp. Enjoy them right away. 


Priya's hobbies Copyright © 2009 Designed by Ipietoon Blogger Template for Bie Blogger Template Vector by DaPino