Creme' Brulee' Sugar cookies

Friday, December 25, 2020


Holidays are always festive with a lot of eating, singing and bonding with your family and friends. I wanted to do something different this time. I usually love gifting my friends with a bunch of handmade goodies, including both food and non-food items.


Difficulty level: Easy
Preparation time: 15 min
Baking time: about 40 min

Ingredients

FOR THE COOKIES
3/4 Cup. (1 1/2 sticks) butter, softened
1/2 Cup packed brown sugar
1/2 Cup granulated sugar
1 large egg
1 tbsp. pure vanilla extract
2 Cup. All-purpose flour
2 tsp. cornstarch
1 tsp. baking soda
1/4 tsp. kosher salt


FOR THE FROSTING
1 (8-oz.) block cream cheese, softened
1 1/4 Cup powdered sugar
1 tsp. pure vanilla extract
1/4 Cup granulated sugar


Preheat oven to 350° and line two cookie sheets with parchment. Cream butter and sugars until light and fluffy, 3 to 4 minutes. Mix in egg and vanilla. In another bowl, whisk together flour, cornstarch, baking soda, and salt, then add mixture to wet ingredients and mix until smooth. Dough will be thick. Using a small cookie scoop ( I used 2 teaspoons- 1 to scoop the batter and the other to slide it out), place tablespoon balls of dough onto parchment-lined cookie sheets. Press down lightly on each cookie to flatten slightly. Bake until edges are just starting to brown, 9 to 10 minutes. Remove from oven and let cool 2 to 3 minutes, then transfer to a cooling rack to cool completely. 

For the frosting: Beat cream cheese until smooth. Add powdered sugar and vanilla and mix until smooth.Put sugar into a small bowl. Spread about a tablespoon of frosting onto tops of each cookie, then press into granulated sugar, coating frosting with sugar.Just before serving, use a kitchen torch to caramelize sugar on top, then set aside to cool. Store cookies in the fridge for up to 4 days. If you do not have a flaming torch, your broiler works just fine.


Chili's Inspired Black bean burger with Ground peppercorn sauce & blue cheese

Friday, December 18, 2020


I used to love going to Chili's ever since that life-changing discovery on one of my early visits.  Their burgers are phenomenal and they can serve  a vegetarian black-bean substitute with all the other toppings, on request. I have been addicted ever since. Shockingly, they do not serve it in any of their locations worldwide outside of US.  I was so addicted to the extent that I wrote to Chili's USA and they responded saying they have logistics issue serving them worldwide as they do not want to compromise on the quality. I hence decided to make them in my kitchen whenever I was craving them. 


Difficulty level- Medium
Preparation time- 15 min
Cooking time- 30 min, for both the sauce & patty together


Ingredients

Cooked black beans- 1/2 cup(refer to my notes on how to cook dry black beans) or 1 14 oz can of black beans
Onion- 1 small
Garlic- 2 cloves crushed or 1/4 tsp minced or powdered garlic
Cajun seasoning- 2 tsp
Bread crumbs- 1/2 cup
Egg-1
Hot sauce- 1/2 to 1 tsp , as desired
Dried herbs- 1/2 tsp
Fresh ground black pepper- 1 tsp
Blue cheese crumbles- 1 tbsp
Salt-to taste
Burger buns, lettuce, tomato, cheese, ketchup- to your liking

For the Ground peppercorn sauce

Butter-35 gms
All purpose flour - 35 gms
Milk- 200 ml( any fat-level will work)
Vegetable stock- 100 ml
Black peppercorns- about 4 tsp
Brandy- optional, 1 tbsp


Preparing the sauce

Crack the black peppercorns in a pestle and mortar (if you don’t have one, put them in a plastic bag, wrap in a tea towel, and hit a few times with a rolling pin) – You want to make sure that the peppercorns are cracked, but do not over-grind otherwise the sauce will lose its intense peppery flavour. In a small saucepan, melt the butter on a low heat. Once the butter is fully melted, gradually add the flour. After each addition mix well to ensure it is fully combined with the butter. Once all the flour is added you should have a thick smooth paste. Cook the butter and flour mix for a couple of minutes stirring regularly – Cooking the butter and flour mix for a couple of minutes before adding the other ingredients ensures that the flour is cooked. If you skip this step your finished sauce may have an odd floury taste. If you decide to add the brandy, add it at this tage and mix well to combine with the butter and flour – adding the brandy at this stage ensures that the alcohol is cooked off.Gradually add the milk , mixing well after each addition to combine with the butter and flour – I like to switch to using a whisk at this stage as it helps to break down any lumps. Once all the milk is combined, add the chicken stock and black peppercorns and season with salt. Simmer gently until the sauce has reduced to your required consistency.


Making the black bean patty

Drain beans well. Put onion and garlic in food processor and blend until fine. Add beans and blend well until mashed consistency. Place into a mixing bowl and add bread crumbs, egg, hot sauce, parsley, Cajun seasoning, and stir. Mix well and shape 4 patties (I opted to make 3 larger patties). Make a dent in the middle top portion and add some fresh ground pepper and some blue cheese crumbles. Seal the opening well. Place on a well-greased stovetop grill pan like I did or use an outdoor grill. Cook 5-6 minutes on each side. You can also broil in the oven for 10-12 minutes per side on a greased, foil-lined pan. Once thoroughly cooked, spread the remaining blue cheese crumbles on top of the patty. If using a pan, add some water all around the patty and close the lid covering the entire pan , after sprinkling the blue cheese. It creates a steaming effect, and makes the cheese melt beautifully over the patty.
Stack them along with all the accompaniments, to your liking and enjoy..

Note- Soak the dry black beans overnight or 8-9 hrs. Cook in a pressure cooker for 3 whistles.


Chewy Jumbo Chocolate Chip Cookies

Friday, December 11, 2020


If you are the lover of a chewy chocolate chip cookie , your journey ends here.


Difficulty level- Easy
Preparation time- 10 min
Baking time- about 15 minutes per batch

Ingredients
3 ½ cups all-purpose flour
1 cup cake flour(if you do not have cake flour, please see my 'Note' at the bottom to see how to make it by yourself)
1 teaspoon baking powder
1 teaspoon baking soda
1 ½ cups butter, softened
1 ¼ cups white sugar
1 ¼ cups packed brown sugar
2 eggs
1 tablespoon vanilla extract
2 cups semisweet chocolate chips
1 cup chopped walnuts (Optional)
M & M for garnish(optional)


Preheat the oven to 375 degrees F (190 degrees C). Sift together the all-purpose flour, cake flour, baking powder and baking soda; set aside. In a large bowl, cream together the butter, white sugar and brown sugar until smooth. Beat in the eggs and vanilla, until well blended. Gradually stir in the flour mixture. Stir in the chocolate chips by hand using a wooden spoon, stir in walnuts if desired. Drop cookies by rounded tablespoonfuls 2 inches apart onto ungreased cookie sheets. Garnish with M & Ms. Bake for 10 to 14 minutes in the preheated oven, until the edges are light brown. Let cookies cool on the baking sheet before removing to wire racks to cool completely.


Note: Measure 1 cup of all -purpose flour. Measure out 2 tbsp of it and replace it by the same 2 tbsp of Corn flour. Your cake flour is ready.


Crab Roast

Friday, November 27, 2020


Crab meat is very hard to extract from the shell. But my son really likes it and so I decided to go through the trouble of extracting it after a long time. 


Difficulty level: Easy
Preparation time- 10 min
Cooking time- 10 min

Ingredients 
Crab - Cleaned & meat separated- 1/4 cup
Onion - cut into thin strips- 1/4 cup
Turmeric powder - 1/4 tsp
Chilly powder - 1 tsp
Ginger garlic paste - 1 tsp
Oil - 2 tsp
Salt -to taste
Curry leaves - 1 sprig


Make sure you clean the crab and separate the meat. Heat oil in a skillet, add the ginger garlic paste and saute well. Add the sliced onions, sprinkle some salt and saute until the onions turn light brown. Add the spices and curry leaves and cook for a minute until the raw taste of the spices have disappeared. Add the crab meat, add salt to taste and mix well. Cover and cook for 7 -10 minutes on a low flame. Serve warm with roti or rice. 


Immunity Booster Series-1 Moringa Stir-fry ( മുരിങ്ങ ഉപ്പേരി)

Saturday, November 21, 2020


There is always a need to boost one's immunity for healthy living. Here is a series of recipes to keep your immunity up.


People have talked on and on about the benefits of Moringa. It is a miracle food. Here I have made one of the easiest stir-fry you can have using minimum ingredients.

Difficulty level: Easy
Preparation time: 30 min
Cooking time: 15 min


Ingredients

Moringa leaves (washed & stemmed) - 3 cups
Oil - 1 tsp ( I use Extra virgin coconut oil, but you could use any neutral vegetable oil)
Mustard seeds - 1/2 tsp
Red chilly powder - 1/2 tsp
Turmeric powder - 1/4 tsp
Salt - to taste
Dry red chillies - 2-3
Shredded coconut(optional) - 1 1/2 tbsp
Curry leaves - 1 sprig

Heat oil in a pan and splutter the mustard seeds. Once done, add broken dry red chillies and the sprig of curry leaves. Add turmeric powder and red chilly powder and saute for another minute. Add the moringa leaves, sprinkle salt on top, mix everything well to get all the spices uniformly distributed . Cover and cook on medium-low flame until the leaves shrink and gets cooked all the way through, about 10 minutes. Mix well and sprinkle the shredded coconut, if you decide to add that in. It is completely optional and even without the coconut the dish tastes great. Let cook for another 2-3 minutes. Serve warm with rice or roti.


Quick Kesar Malai Laddoo

Friday, November 13, 2020


Happy Diwali everyone...

During these odd times, nobody wants to spend hours in the kitchen preparing Diwali sweets. I am in the same boat and hence came up with a laddoo, so instant ( when you compare it to the rest of the sweets usually prepared for Diwali), you would never believe how easy this is with no compromise on the taste.


Difficulty level: Easy
Preparation time: 10 min
Cooking time: 2-3 min


Ingredients
  • Milk powder- 1 cup
  • Ghee( clarified butter)- 1/ 4 cup plus 1 tbsp, and a couple of drops to grease your palm to make the laddoos
  • Cashews- 12-15
  • Raisins-25
  • Granulated sugar- 1/4 cup
  • Cardamom- 3 pods
  • Saffron- a few strands


In a skillet, heat 1 tbsp ghee(clarified butter) on medium-low heat and roast the cashews until they turn golden brown and put aside. To the same ghee, add the raisins and fry them until they puff up. Keep aside. Add the rest of the ghee and allow to melt completely. Turn off the stove and after 3-4 minutes add the strands of saffron. This will allow the flavors to infuse into the ghee slowly.

While the ghee cools completely, powder the sugar and the seeds inside the pods of cardamom into a fine powder. Also crush the roasted cashews using a mortar and pestle or a food processor (just pulse it a couple of times). In a mixing bowl, add the milk powder, powdered sugar, crushed cashews, roasted raisins and mix well. Pour the saffron-infused ghee on top and mix well using a spatula. Once it is thoroughly mixed, grease your palms and roll the mixture into small lemon-sized balls. This yields 14 such laddoos. The number may vary depending on the size of your balls. It stays fresh at room temperature for 3-4 days.


Oreo Fudgy Brownies

Saturday, November 7, 2020

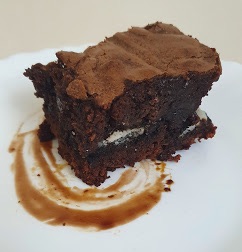
Oreos are a kids' favorite and a lot of the adults I know love it too. I have incorporated Oreos and marshmallows to the brownie to make it all the more chewy. It is a fudgy, chewy, brownie goodness which will make you go back for more. 


Ingredients

1 cup butter, melted
1 cup granulated sugar
1 1/2 cups light brown sugar, packed
1 tablespoon vanilla
4 large eggs
1 teaspoon kosher salt
1 1/2 cups all purpose flour
1 cup unsweetened cocoa powder
1 cup white chocolate chips
1/2 cup mini marshmallows
30 Oreo cookies coarsely chopped


Preheat your oven to 350°F/175°C. Line 9×13 pan with foil and spray with nonstick spray. Set aside. In the bowl of stand mixer fitted with the paddle attachment combine the butter, granulated sugar, brown sugar, vanilla, and eggs. Mix on medium speed until combined, about 1 minute. Add in salt and the cocoa powder and mix on medium until combined, 30 seconds to a minute. Turn the mixer to low and add in the flour until incorporated. Mix in the chocolate chips and mini marshmallows. Spread half of the batter into the pan. Top with the Oreos and spread the remaining batter on top.

Bake for 35-40 minutes until the centre is almost set. It can stay fresh in an airtight container for about 3 days..I doubt this will remain at the end of the 3rd day anyway...

Old-fashioned Apple Cobbler

Friday, October 30, 2020


I really miss the falls in the US. It used to be my favourite season. With the nature looking its prettiest in fall colors and the aroma of the seasonal harvest filling the air , we used to go apple-picking. I used to make everything imaginable with apples. This is one of my favorites. 
Difficulty level : Easy
Preparation time: 15 minutes
Baking time:  40-45 minutes

Ingredients

  • medium apples (Granny Smith, Golden Delicious, or other good baking apple), peeled and cut into chunks ¼ inch thick
  • 1 cup water or apple juice
  • 1/3 cup brown sugar , packed
  • 1 Tablespoon cornstarch
  • 1 Tablespoon lemon juice
  • 1/2 teaspoon vanilla extract
  • 1 teaspoon ground cinnamon
  • 1/2 teaspoon ground nutmeg
  • 1/8 teaspoon salt

For the batter:

1 c
  • 1 cup all-purpose flour
  • 1 cup granulated sugar
  • 2 teaspoons baking powder
  • 1/4 teaspoon salt
  • 3/4 cup milk
  • 5 Tablespoons butter , melted
  • ground cinnamon for topping


Directions: 

  • Preheat the oven to 350°F and grease a 9×13 inch pan lightly with cooking spray.
  • Stir together brown sugar, water, cornstarch, lemon juice, vanilla, cinnamon, nutmeg, and salt together in a saucepan. Stir in apples. Cook over medium heat for 3-5 minutes, stirring.
  • Pour mixture into prepared pan.
  • In a large bowl mix together the flour, sugar, baking powder, and salt. Stir in the milk and melted butter, just until combined.
  • Pour the mixture over the apples in the pan. Sprinkle lightly with cinnamon.
  • Bake for about 38-40 minutes or until a toothpick inserted into the topping comes out clean.
  • Allow to cool for at least 15 minutes before serving. Serve warm with vanilla ice cream, if desired.
  • Cover and store leftovers in the refrigerator for up to 4 days


    .

Make Ahead:
You could prepare the apple filling and store it in the fridge for up to 3 days, or freeze it for up to 3 months.
You can also freeze the baked cobbler for up to 3 months. Thaw overnight in the refrigerator and warm in the oven before serving.


Coconut Burfi (Microwave)

Friday, October 23, 2020


During the Navrathri(festive) season, everyone is in the lookout for quick sweets you can whip up in a jiffy with this recipe from Tarla Dalal. You could add some color, but I decided to keep it colorless as it is for offering to Goddess Saraswathi for the Navrathri pooja. As the preparation is completely in the microwave, it will save you a lot of time and energy you would otherwise spend in front of the stove.

Difficulty level: Easy
Preparation time: 5 min
Setting time: 1 hr.

Ingredients
Grated coconut- 1 cup
Ghee- 2 tsp
Milk- 1/4 cup
Sugar- 3 tbsp
Cardamom- 1/4 tsp
Color-optional, a pinch


Mix the grated coconut and ghee well in a microwave safe bowl, and cook for 2 minutes, stirring after 1 minute. Take the bowl out, add in the rest of the ingredients. Mix them thoroughly and cook for another 2 minutes , stirring after 1 minute. Transfer on to a greased dish with 5" diameter and allow to set for 1 hr. Cut into desired shapes and enjoy.


Chicken Coconut Fry

Friday, October 16, 2020


Coconut is used in every possible way in our neck of the woods. Here I have used it in its raw , grated form. I am always in the lookout for a new way to prepare chicken , which happens to be the most popular meat in my house any way. 

Difficulty level: Medium

Preparation time: 10 min plus 2 hrs for marination

Cooking time: 30 min


Ingredients

Chicken- whole, curry cut (roughly 10 pieces)

Lime juice- 1 tbsp

Coriander powder- 3 tbsp

Chilli powder(spicy)- 1 1/2 tbsp

Kashmiri chilli powder- 1 1/2 tbsp

Salt- to taste

Ginger paste- 2 tsp

Garlic paste- 1 tsp

Grated coconut- 1 cup

Crushed red chilly flakes- 1 tsp

Garlic- 4 cloves whole with skin, slightly crushed

Curry leaves- 5 sprigs

Extra virgin coconut oil- 3 tbsp


First, marinate the chicken and keep aside for 2 hrs. Mix together both the chilli powders, coriander, lime juice, ginger paste, garlic paste and salt well and apply uniformly on all the chicken pieces. 

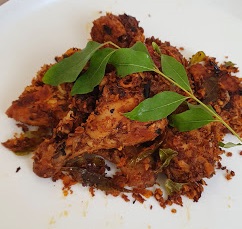
In a frying pan, heat 1 tbsp of  extra virgin coconut oil and add the grated coconut , crushed red chilly flakes, whole garlic cloves, curry leaves and a pinch of salt. Fry them on low flame so as to ensure the coconut  does not get burnt. Don't rush it by increasing the flame, it is very well worth the wait.  Once the coconut turns light brown , remove and keep aside. To the same oil, add the remaining oil and add the chicken pieces . Turn the chicken pieces making sure they are thoroughly cooked. Once they are, add the roasted coconut mixture and mix well for all the flavours to marry together. Roast on a very low flame for 3-4 minutes. Serve warm with rice or chapathi or roti .


Mango Peda/Mango Fudge

Friday, October 9, 2020


Peda is a very traditional Indian sweet. It can very well be made instantly at home with a little bit of  patience and elbow grease. I wanted to combine the flavour of mangoes to give it a twist. Who doesn't like mangoes? I have made minor changes to the recipe from Archana Hebbar here. This stays in room temperature for a week, so feel free to make plenty to share. 


Difficulty level: Medium
Preparation time: 5 min
Cooking time: 30-40 min

Ingredients

  • Ghee( clarified butter)- 2 tbsp
A few strands of saffron
Mango pulp- 1 cup
Granulated sugar- 1/4 cup
Milk powder- 1 cup
Powdered cashew- 1/4 cup
Cardamom powder- 1/4 tsp


In a large frying pan heat 2 tbsp ghee, ¼ cup milk, few thread saffron and 1 cup mango pulp.
Stir well making sure everything is well combined.
Now add ¼ cup sugar and stir until sugar dissolves completely.
Further, add 1 cup milk powder and ¼ cup cashew powder.
Mix well making sure the mixture is well combined.
Mash well making sure there are no lumps present.
keeping the flame on low, stir continuously. the mixture thickens after 5 minutes.
Further, add ¼ tsp cardamom powder and mix well.
After 15 minutes, the mixture starts to separate the pan and holds shape. do not overcook as the peda hardens.
Transfer the prepared mixture into a greased plate and spread uniformly.
Cool for 5 minutes, and start preparing ball-sized peda.
Design using the flower mould if you happen to have it. you can also decorate using a toothpick or fork. I have kept it naked here.
Mango peda stays fresh for a week when stored in an airtight container.


Cheesy straws

Sunday, October 4, 2020


With the kids studying from home due to the pandemic, there is an insatiable need for a variety of snacks at home. I decided to whip something up with things I had in hand. The more cheese you add, the yummier it gets. And who doesn't like cheese....


Difficulty level: Easy

Preparation time: 15 min

Baking time: 25 min


Ingredients

Puff pastry sqaure sheets- 10

Shredded cheese- atleast 1 1/4 cups(I used cheddar & parmesan combined)

Italian seasoning- 2 tbsp

Fresh ground black pepper- 2 tbsp

Salt- to taste


Thaw the puff pastry sheets for atleast 3 hrs. Preheat the oven to 400F. 

Combine the shredded cheese, Italian seasoning, fresh ground black pepper and salt well and keep aside. 

On a working surface, spread some the cheese mixture evenly. Put one of the puff pastry sheets and press down lightly so that the cheese mix sticks to the sheet. Spread more of the cheese mix evenly and pat down. Make 1 inch wide strips using a pizza cutter. Twist the strips to make them  curly. Transfer to a baking tray. Bake for 25 minutes until the cheese has melted and and the puff pastry has turned crisp. Enjoy them right away. 


Sticky Toffee Pudding

Friday, September 25, 2020


Whenever we go to P.F.Chang's we always get their Sticky Toffee Pudding. My elder son absolutely loves this and what better way to surprise him than have a home-made version for his birthday. I decided to give it a shot for the first time ever also because I can sneak in some dates into them ( my kids just call dates "gross"...for their gooey texture)...shh...just don't tell them..

The recipe from Martha Stewart makes divinely rich and melt-in-the-mouth Sticky Toffee Pudding.

Difficulty level: Medium

Preparation time: 20 min

Baking time: about 30 min

Pudding
6 tablespoons unsalted butter, room temperature, plus more for dish
1 1/2 cups all-purpose flour, plus more for dish
8 ounces Medjool dates, pitted and coarsely chopped (about 1 1/4 cups)
1 cup scalding-hot strong brewed coffee( I just used 1 cup boiled water as I was not sure whether my kids would taste the coffee flavour)
1 teaspoon baking soda
1 teaspoon baking powder
1/2 teaspoon coarse salt
3/4 cup lightly packed dark-brown sugar
2 large eggs, room temperature

Sauce
1 stick unsalted butter
1 cup lightly packed dark-brown sugar
3/4 cup heavy cream


Directions

Preheat oven to 325 degrees. Butter and flour a 2 1/2-quart baking dish. Place dates in a bowl, pour coffee over dates, and let soak 15 minutes. Stir in baking soda.

Whisk together flour, baking powder, and salt. Beat together butter and sugar with a mixer on medium-high speed until pale and fluffy, about 3 minutes. Reduce speed to medium and beat in eggs, one at a time, until thoroughly incorporated.

Reduce speed to low, and add half the flour mixture, beating until combined. Add date mixture and remaining flour mixture, and beat until just combined. (Do not overmix.) Transfer batter to dish, and bake until cake is puffed and springs back in center when gently pressed with a finger, about 25 minutes.

Sauce: Meanwhile, combine butter, sugar, and cream in a medium saucepan and bring to a boil over high heat. Reduce heat to medium (so sauce does not boil over) and boil, stirring frequently, until sauce thickens and darkens slightly, about 4 minutes.

Remove cake from oven and pierce holes at 1-inch intervals to bottom of cake with a wooden skewer. Pour half of hot sauce over cake and let soak 20 minutes. Serve warm with remaining sauce. Cake soaked in sauce and remaining toffee sauce can be stored at room temperature up to 1 day. Before serving, warm cake in a 300 degrees oven 10 minutes, and sauce in a small saucepan over medium heat.


Priya's hobbies Copyright © 2009 Designed by Ipietoon Blogger Template for Bie Blogger Template Vector by DaPino